
Do you want to learn how to effectively use Trellis? You've come to the right place.
Expand the panels below to read our how-to guides for specific features and processes.
Getting started
Sign in to Trellis at http://advise.trellis.arizona.edu/. (Sign in with your UA NetID credentials.)
We recommend using Google Chrome as your web browser for Trellis.
Navigating to your profile
You can see and edit your Trellis profile details directly in the app. To access your profile:
- Select your circular profile picture at the top right of the screen.
- In the dropdown window, select either your name or profile picture.
Editing your profile details
We recommend that you edit your profile details, such as your title, phone number, and personal Zoom link. Students will see your title, phone number, and Zoom link when they use Trellis.
Your title is how you let students know which majors, minors, or other areas you advise for. It's important to come up with a title that is descriptive and succinct so students can easily find you. This title will appear for students when they use the search function.
In addition, your phone number and personal Zoom link will automatically fill out their respective fields when you create availability and appointments. Students will also see these when scheduling an appointment with you or checking on drop-in times (if you've specified the respective meeting types).
To edit your profile:
- Go to your profile page (follow the instructions above).
- Select the "Edit" button on the right side of the page.
- Type in your title, phone number, and personal Zoom link.
Need help finding your personal Zoom link? See Zoom's official help article. To get to your Zoom profile:
- Go to https://arizona.zoom.us/.
- Select the "Sign in" button.
- Sign in with your NetID credentials.
Updating your profile photo
We recommend that you update your profile picture as well. The main reason to update your profile photo is that students will see it when they sign in to Trellis. To see what this would look like to students, watch our student experience video.
To update your profile photo:
- Go to your profile page (follow the instructions above).
- Select the circular photo on the left side of the page.
- Select "Update Photo" from the dropdown menu.
- Upload your photo.
- Make sure the resolution is high.
- Select the "Save" button in the bottom right of the modal window.
Finding your calendar link
You can provide your students with a link that directly takes them to your calendar. To find this link:
- Go to your Trellis profile.
- Find the "Calendar Link" field and copy the link.
We recommend replacing your UAccess and ARC website links with your specific calendar link, rather than the general link for students.
Advisors using the calendaring function will need to follow some steps before working with the system more.
First, check your data. Make sure your caseloads are correct, and that your preferred meeting room or office is in our "Where" records.
Next, set up your profile. Read our guide on setting up your profile to learn how.
Trellis contains the following navigational tools:
- App Launcher
- Advisor Home tab
- Main navigation menu
- Global search bar
App Launcher
The App Launcher contains all the applications and tools available to you.
To access the App Launcher, select the waffle icon (the 9 dots) in the top left of the screen.
Home tab
The Home tab contains the calendar view and your list of upcoming appointments for the day. This is the recommended location for managing your availability and appointments.
You can access your calendar and upcoming appointments by selecting the "Home" option in the main navigation menu.
To learn more about the specific functionality of the advisor home, see our help articles on creating and editing availability and appointments.
Main navigation menu
The main navigation menu gives you access to different views of items and records in Trellis. To access the navigation menu, select the dropdown arrow to the right of your current view's name.
"Home" and "Queue Check-in" take you to specific views with specialized functionality.
The other options let you see a list of all the records of a certain object, such as "Availability" or "Appointments".
You can also access Chatter from the navigation menu. See our help article on using Chatter for more information.
Global search bar
Use the global search bar to find records in Trellis. You can start typing what you are looking for and the system will return possible matches, which can include contacts, appointments, cases, and more.
The global search bar is at the very top of the Trellis interface. You can filter your search, or type in your query to search all records.
Regardless of what program or process you are currently using, you'll need to update some links and other info across multiple sites and services. See below for details.
- Ask your advising director to update your UAccess Student link (the "Schedule appointment" link) to https://ua-trellis.force.com/uastudent.
- You can see who your director is by checking the advisor assignment table in UAccess.
- Work with your website managers to update web pages that link to your advising calendar or scheduling software.
- Use the same link as above (https://ua-trellis.force.com/uastudent).
Wise Advising recommendations
See our page on transitioning from Wise Advising to Trellis Advise for detailed instructions and recommendations.
Chatter is a tool within Trellis that allows you to receive and provide peer-to-peer support. It is an open forum where you can ask and answer questions with other advisors. You can access Chatter and our support materials directly in Trellis; no need to leave the tool.
Our hope is that all advisors keep an eye on it and help each other out. If needed, Trellis team members will help answer questions as well. If we see consistent patterns in questions or concerns, we’ll create more support documents for you.
By using Chatter, you can help the Trellis team do a more effective job of supporting you.
Navigating to Chatter
You can access Chatter by going to the main navigation menu and selecting "Chatter".
Using Chatter
Once you navigate to Chatter, select the "Advise Support" group on the left sidebar.
In this group, you can post a helpful tip or best practice, start a poll, or ask and answer questions. You can also like and comment on posts.
Knowledge is a tool within Trellis that contains all of our training and support documentation. Use our Knowledge articles as your first line of support. You can find frequently-asked-question (FAQ) articles and how-to guides for specific features and processes. You can access these support materials directly in Trellis; no need to leave the tool.
Finding Knowledge articles
You can access Knowledge articles from the help menu or global search.
To see the help menu, select the question mark ("?") at the top right. [what will the new tab for Knowledge articles be called?]
To use global search, select the search bar at the top and search for articles. You can narrow your search down to just Knowledge articles by selecting the dropdown menu to the left of the search bar and selecting “Knowledge”.
Creating & managing availability
Creating availability is how students can schedule appointments with you or see drop-in hours.
To create availability on your calendar:
- Go to your advisor home.
- Select any empty space on the calendar.
- You can also select the "Add to calendar" button on the left side, then select "New Availability" from the dropdown menu.
- Fill out the availability form.
- All fields marked with a red asterisk are required.
See below for a walkthrough of the availability forms.
Select availability type
Select between appointments or drop-in. If you select appointments, students can schedule appointments with you. If drop-in, students can see the details of the drop-in hours. See our other help articles on creating availability below for detailed walkthroughs of each section of the form.
Creating availability for appointments allows students to schedule appointments with you in Trellis based on your specifications.
When you create availability, the "Appointments" availability type should be selected by default. Following this are multiple fields for you to fill out. All fields marked with a red asterisk are required.
Availability name
By default, the availability name is "[your name]'s Availability". We recommend changing this to something unique to distinguish it from other availability. For example, you could name it "Oct 22, 2019 at 1-4pm, Freshmen", or whatever works for you.
The reason it is important to make the availability name unique is that if you schedule an appointment on behalf of a student, you will need to identify the specific availability to match to the appointment. See the "Create an appointment" help article for more details.
Availability date & start time
These fields are self-evident.
Number of appointments, duration of each appointment, & end time
Setting the number of appointments and duration of each appointment allows students to schedule appointments themselves. For instance, say you have availability with 4 appointments that are 30 minutes each. A student could select one of those appointment blocks to schedule an appointment with you.
Based on the number of appointments and duration of each appointment, the end time is automatically calculated.
Appointment scheduling deadline
Setting an appointment scheduling deadline means students have to schedule an appointment before the deadline. For instance, if the deadline is two hours, then students must schedule their appointment two or more hours before the appointment's start time.
This feature is useful if you want ample time to prepare for your advising appointments and want to prevent last-minute appointments.
Make recurring availability
You are able to create an availability of any type (appointment, drop-in, or busy) one time and have that availability recur on your calendar for one or more days per week across multiple weeks.
To create a recurring availability, select the checkbox labeled "Make recurring availability". After selecting the checkbox, you will see additional options for modifying your recurring availability.
This will create an instance of the recurrence on the selected day(s) of the week, occurring every X weeks until the end date. Note, the system will only allow for instances of your recurrence to be created up to 90 days from the start date of the first availability in the series.
Meeting types
Select one or more meeting types. You can choose between in-person, Zoom, or phone. When you select an option, a new field will appear based on the option.
If in-person, search for the availability location. This is a record search field, so it pulls from records already in Trellis. Type the first two characters of any word in a building name or room number, then type a "*" after those characters as a wildcard to search. (e.g. Mc* Ha* 21* returns McClelland Hall, Rm 210). If the room you want isn’t in the system, contact 24/7 IT Support and the Trellis team will add it.
The Zoom link and phone number automatically fill in based on what you specified in your profile. But, you can manually edit them in the availability form if you want.
For the phone option, you can select "I will phone the student" if you want to call the student, instead of them calling you. If you check this, the student will provide their phone number when they schedule an appointment with you.
Populations
Populations indicate which students are able to see the availability. For example, if you add the "Undergraduates (All)" population, then all currently-enrolled undergraduate students can see the availability. But, students that are not undergraduates can not see that specific availability.
Adding populations is the same as adding appointment types above. You have to choose at least one population, though you can add multiple populations.
See our help article on using populations for more info.
Saving your availability
You have a few options for saving your availability at the bottom of the modal window: save, save & new, and save & clone.
"Save" simply saves the availability and takes you back to the advisor home.
"Save & New" saves the availability and brings you to a new, mostly blank form (only the defaults are filled out, such as availability name).
"Save & Clone" saves the availability and brings you to a form that is the exact same as the one you just filled out.
Creating drop-in availability allows students to meet with you without an appointment.
This form is similar to creating availability for appointments, with some differences. See below for a walkthrough of each section of the form.
Availability name
By default, the availability name is "[your name]'s Availability". We recommend changing this to something unique to distinguish it from other availability. For example, you could name it "Oct 22, 2019 at 1-4pm, Freshmen". Whatever works for you.
Availability date, start time, & end time
These fields are self-evident.
Make recurring availability
You are able to create an availability of any type (appointment, drop-in, or busy) one time and have that availability recur on your calendar for one or more days per week across multiple weeks.
To create a recurring availability, select the checkbox labeled "Make recurring availability". After selecting the checkbox, you will see additional options for modifying your recurring availability.
This will create an instance of the recurrence on the selected day(s) of the week, occurring every X weeks until the end date. Note, the system will only allow for instances of your recurrence to be created up to 90 days from the start date of the first availability in the series.
Group
If you've built a user group, choose which advisors share this drop-in availability. For more info, see our help article on creating a user group.
Meeting types
This is nearly identical to selecting meeting types for appointment availability.
Select one or more meeting types. You can choose between in-person, Zoom, or phone. When you select an option, a new field will appear based on the option.
If in-person, search for the availability location. This is a record search field, so it pulls from records already in Trellis. Type the first two characters of any word in a building name or room number, then type a "*" after those characters as a wildcard to search. (e.g. Mc* Ha* 21* returns McClelland Hall, Rm 210). If the room you want isn’t in the system, contact 24/7 IT Support and the Trellis team will add it.
The Zoom link and phone number automatically fill in based on what you specified in your profile. But, you can manually edit them in the availability form if you want.
For the phone option, the student will be phoning you. You don't have the option of phoning the student because it's a drop-in.
Saving your availability
You have a few options for saving your availability at the bottom of the modal window: save, save & new, and save & clone.
"Save" simply saves the availability and takes you back to the advisor home.
"Save & New" saves the availability and brings you to a new, mostly blank form (only the defaults are filled out, such as availability name).
"Save & Clone" saves the availability and brings you to a form that is the exact same as the one you just filled out.
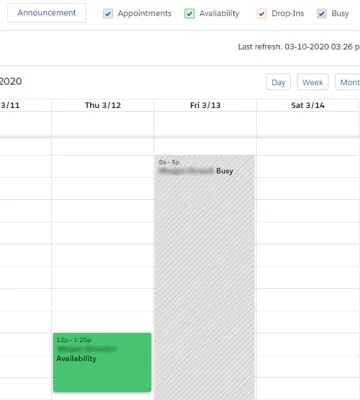
If you need to communicate a period of unavailable time on your calendar, you can set up a "Busy Block".
- Select an empty space on the calendar.
- Or, select "Add to Calendar", then "New Availability".
- Choose "Busy" at the top as the availability type.
- Name the block of time as you want it to appear on your calendar.
- Students will see the name of this busy block of time.
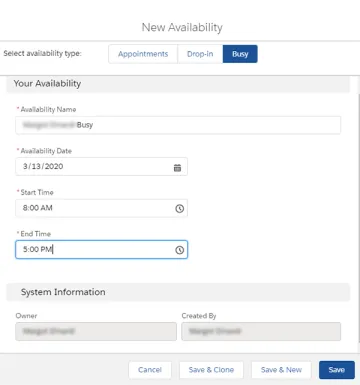
The block of time will appear on your calendar as gray with diagonal stripes.
User groups allow you to associate multiple advisors with a drop-in availability.
Creating a new user group
- Go to the User Group list view. (See the help article "See a list of records" to learn how.)
- Select the "New" button in the top right.
- Name your group.
- Be very specific with your user group's name so it's searchable and recognizable.
- Save the group.
- Add new users to the group one at a time.
- Add yourself to the group, too, or you won't be a part of it.
To edit users in the user group, go back to the record and select the "Edit" button in the top right.
Best practices & considerations
- You can only be a part of one user group.
- As a result, it would be helpful to designate one person in your department to manage your user group.
- If you're added to multiple user groups, Trellis just picks the first one that's available.
- You can add a description to the group.
- If it's just you doing drop-ins, don't make a group.
Viewing & editing your availability
- Select an availability block on the calendar.
- A popover with details of the availability will appear.
- Select "Edit" in the bottom right of the details view to view and edit the availability form.
Make recurring availability
You are able to create an availability of any type (appointment, drop-in, or busy) one time and have that availability recur on your calendar for one or more days per week across multiple weeks.
To create a recurring availability, select the checkbox labeled "Make recurring availability". After selecting the checkbox, you will see additional options for modifying your recurring availability.
This will create an instance of the recurrence on the selected day(s) of the week, occurring every X weeks until the end date. Note, the system will only allow for instances of your recurrence to be created up to 90 days from the start date of the first availability in the series.
Cloning your availability
- Follow the steps to view and edit the availability form.
- Select the "Save & Clone" button in the bottom right of the modal window.
Best practices & recommendations
- Set up your availability for a couple of weeks, or however long you want.
- Tip: When setting up your availability, clone your first availability for a couple of weeks. This can save a lot of time when creating availability.
- Note: There are no restrictions on how far into the future students can see your availability.
You can manage other advisors' calendars in Trellis.
In Trellis, each advisor is assigned to a group. Most people's groups are their college.
Within your designated group, you can:
- view another person's calendar.
- create another person's availability (includes creating recurring availability).
- Best practice: Only create availability for someone else if it's for appointments. If you want to create drop-in availability, we recommend doing so from your own calendar.
- create and edit another person's appointments.
You can only delete availability and appointments if you’re higher up.
Viewing another's calendar
- Go to the advisor home.
- Select the dropdown menu that says "MY CALENDAR" on the top left of your calendar.
- Select an advisor name.
You will then be taken to that advisor's calendar. This calendar functions the same as your own, meaning you can select an empty spot on the calendar to create availability, and so on.
Types of populations
Your assigned caseloads come from UAccess and are automatically added to your list of available populations. Select "Add all caseloads >>" to add all caseloads to the availability, and select "<< Remove all caseloads" to remove them all.
General caseloads are available to most advisors automatically. The "Undergraduates (All)" population is an option for all undergraduate advisors, and the "Graduates (All)" population is an option for all graduate advisors. The "No Active Student Enrollment" population is available to all advisors. Use this if you want people that aren't active students to see your availability (such as prospective students).
Finally, you can create custom populations.
Custom populations
Custom populations allow you to get more specific with the audience for your availability.
You can create custom populations when creating availability. Select the "+ new population" button at the bottom left of the availability form to make a new custom population.
You have two options for creating a custom population: manually creating a population, or creating a population via uploading a CSV file.
When you save a custom population, it will immediately show up in the population list.
Create manually
With this, you can build a population by defining custom criteria and options. A student has to match all the criteria listed in a population to see the availability it's assigned to.
You only have to fill out one field minimum, such as setting program, plan, campus, location, etc. The fields on the form are based on PeopleSoft.
Some fields auto-fill based on what you choose in other fields. For instance, if you fill out plan, then program will usually auto-fill based on the selected plan.
You can only set one student group for each population, which helps you get specific when creating availability.
Create by upload
With this, you can create a population by importing student records from a CSV file. CSV is a standard spreadsheet file that you can export from Excel.
For this option to work, make the first column of your spreadsheet file the student ID, and make the second column the student name.
Student ID is the only required field. Having student names in the second column is helpful for you, but not required.
Managing populations
To edit and delete custom populations you've created, go to the Population list view. Access this via the App Launcher by searching or selecting "Populations". Select the dropdown arrow to the far right of a population to edit or delete it.
Only delete your assigned caseload populations in UAccess. Never edit or delete them in Trellis.
Don’t use the “new” and “import” buttons on the list view to create populations. They don't show the same form as when you create a population from the availability form on the calendar, so the records will be incomplete.
Creating & managing appointments
If you need to create an appointment for a student, you can manually do that.
To create an appointment:
- Go to the advisor home.
- Select the "Add to Calendar" button on the left side of the page.
- Select "Add Appointment" from the dropdown menu.
This form is similar to the availability forms, with some differences (see below). All fields marked with a red asterisk are required.
Contact
The contact field is where you add a student to the appointment. This is a record search field, so it pulls from records already in Trellis. If the student you want to add isn’t in the system, contact the Trellis team and we'll work it out.
Appointment type
Assign an appointment type. These are the same appointment types on the availability form.
Appointment status
By default, this is set as "Scheduled" when you make a new appointment, but you can change it.
Meeting types
Choose either in-person, Zoom, or phone.
If you select phone, you can choose if you will call the student by selecting "I will call". If you select that, you need to enter the student's phone number.
Email confirmation
You can choose whether or not to send an email confirmation to the student when you save the appointment.
Availability
This field is optional. If you're making an appointment outside of your availability, then don't fill this out. If you're making an appointment that overlaps your availability and takes the place of another appointment, then add the appropriate availability on the form.
If you don't add an availability, then the appointment will not take the time from the availability. This means that another student will see that time as available, and you can get double-booked!
For now, you can only add availability for yourself, not other people's availabilities.
Appointment details
This field is the reason the student is meeting with you.
Best practices
- Change the status of the appointment to "Canceled" so the student gets a confirmation email.
- Deleting an appointment without changing the status does not send a confirmation email to the student.
- Availability and appointments have an important connection with each other, so they should always be attached to each other.
- Be careful about modifying availabilities that have appointments attached to them.
- Edit both the availability and the appointments associated with it, not just one or the other.
- You could also disassociate an appointment first, then edit the availability, then reassociate the appointment.
Viewing & editing your appointments
- Select an appointment block on the calendar.
- A popover with details of the availability will appear.
- Select "Edit" in the bottom right of the details view to view and edit the appointment form.
Best practices for editing records from a list view
Only use the advisor home workflow to create, edit, and delete availability, appointments, and populations. Do not create or edit records from the list view because the records will be incomplete.
The only field you should edit from the list view is the "Appointment Status" field on the Appointments list view. As a side note, deleting an appointment record does not send a confirmation email to the student. We recommend changing the status of the appointment to "Canceled" so the student gets an email.
To edit a record from the appointments list view, select the down arrow button to the far right on the record's row. You can also edit and delete availability and appointments from the advisor home
Inline editing
To inline edit on the list view, change the list view to only one record type (e.g. either appointments or drop-ins). You have to have only one record type in the list view for inline editing to work.
Managing Cases & Case Details
Overview of cases
In Trellis, notes on an interaction are called Cases.
There are two parts to Cases in Trellis: Cases and Case Details. A Case is a high-level overview of an interaction. On the other hand, a Case Detail is the notes from the advisor. As a result, some people might have access to view Cases, but not Case Details.
- All undergrad advisors can see all undergrad Case Details. All grad advisors can see all grad Case Details.
- Advising directors, managers, advisors can see case details.
- Student workers and staff can't see case details (currently).
How to create a case
From an appointment
- Make an appointment on your advisor calendar.
- After the student comes in, you're ready to make a case.
- Access the appt record.
- If you are making a Case for an appointment the same day you had it, the right sidebar on the calendar view will show today's appointments and you can access the record from there.
- You can also access the appointment record via the Appointments list view.
- Select the "New Case Detail" button in the top right.
- Fill out the fields. Some tips and best practices include:
- The "note type" and "appointment status" fields are auto-populated based on the appointment record, but you can change these manually.
- "Note type" is "Academic Advising" by default.
- The appointment status is "attended" by default. This is because the system assumes that since you're making a Case, the student attended the appointment.
- You can select multiple note types by clicking while holding Ctrl (Windows) or Cmd (Mac). You can also Shift+click to select many types at once.
- You can copy and paste in the comments field.
- If you need to, you can stretch comments field by clicking and dragging the bottom right of the box.
- The "note type" and "appointment status" fields are auto-populated based on the appointment record, but you can change these manually.
- When you finish filling out all the fields, select the "Next" button.
- You can then attach file(s).
- For now, you can upload pretty much any file type.
- There is a 2g file size limit per file.
- When creating a note, you can only attach one file. You can go to the Case Details after creating it to attach more files.
- Select the "Finish" button.
From a student's contact record
This is most useful when creating notes for a drop-in appointment, or for any other situation where you interacted with a student that didn't schedule an appointment with you.
- Go to a student's contact record.
- Select the "New Case Detail" button in the top right.
- Fill out the subject, note type, and comments fields.
- Check the box to create a drop-in appointment if you want.
- If you check it, you'll create a drop-in appointment on the next screen.
- If not, go straight to attaching files.
- Attach files.
- Finish.
The major difference between each of the above workflows is drop-in appointment checkbox and creation.
You can add more than one Case Detail to a Case. This is useful for adding more comments to a Case when you have passed the time period for editing Case Details.
To add another Case Detail to a Case:
- Go to the Case record.
- Select either the "Create new..." or "Add" button on the right side.
- Fill out the form.
Keep in mind, you can add more attachments to Case Details past the time period for editing.
Viewing & editing cases
Once you create a case, you will be taken back to the record you were previously on (i.e. an appointment or contact).
To view the case record
- Go to the contact record associated with the case.
- Select the "Case Details" tab.
- Select the case number.
What you can see & edit on a case record
- On the lefthand content:
- Make a new case detail for this case in the "Related" tab, select the "New" button.
- On the right sidebar:
- Use this if you're past the edit period for case details
- Select the "Add" button
- See the most recent activity on the record
Viewing & editing case details
To view case details records
- Select the "Related" tab on the Case record.
- Select the Case Detail Name (likely "CD-00...")
What you can see & edit on a case details record
- On the lefthand content:
- see case details fields (e.g. comments)
- Edit your comments by selecting the pencil icon to the right of a field. You can also select the "Edit" button in the top right.
- *You can edit the case detail up to 11:59pm the same day you created it.
- If you're past the edit period for a case detail, you'll have to create a new case detail on the case record.
- see and upload files as attachments to the case details
- On the right sidebar:
- email a student
- This will create an email that is related to the case details record.
- Only people with permissions to view case details can see the email.
- See the most recent activity on the record
- email a student
There is a way to see all of your appointments without Cases in Trellis. To view this report:
- From the main navigation menu, select "Reports".
- Select "All Reports" on the left sidebar.
- Using the report search bar, search "My Appointments without Cases".
- Select the report titled "My Appointments without Cases" made by "Tech Prod".
- There might be duplicate reports with the same title made by others.
Viewing records
You can view a student's contact record to see details such as EmplID/student ID, NetID, and email.
Search for a specific student with the global search bar at the top of every page.
Once you're on a student's contact record, select the “Related” tab next to “Details” to see records related to the student, such as appointments, cases, enrollments, etc.
You can locate the student's schedule with the UAccess link under "Additional Information".
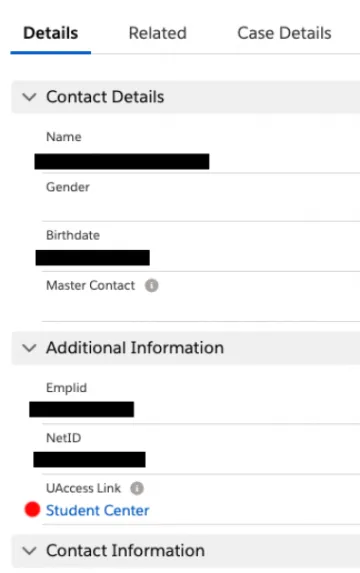
UAccess link in Contacts
The advisor home provides a comprehensive, clear view of your availability and appointments. You can also see records for one object in a list view.
Navigating to the list view
There are a few ways to view a list of records:
- Select an object name on the top navigation bar.
- Only a few of the main objects you'll be working with are in the navigation bar.
- Select the app launcher in the top left and search for your desired object.
- You can type something in the search bar or browse the list of all items.
Using the list view
To switch your list view:
- Select the list view's name in the top left.
- Select a list view from the dropdown menu.
You can also pin a certain list view to make it appear by default for that object. Select the pin icon to the right of the list view name.
Viewing records
To view a record, select its name in the list view.
Best practices for creating, editing, & deleting records
Only use the advisor home workflow to create, edit, and delete availability, appointments, and populations. Do not create or edit records from the list view because the records will be incomplete.
Inline editing
The only field you should edit from the list view is the "Appointment Status" field on the Appointments list view. As a side note, deleting an appointment record does not send a cancellation email to the student. We recommend changing the status of the appointment to "Canceled" so the student gets an email.
To edit a record from the appointments list view, select the down arrow button to the far right on the record's row. You can also edit and delete availability and appointments from the advisor home.
To inline edit on the list view, change the list view to only one record type (e.g. either appointments or drop-ins). You have to have only one record type in the list view for inline editing to work.
Editing populations
To edit and delete custom populations you've created, go to the Population list view.
Never delete your caseload populations from Trellis. Instead, go through UAccess to edit or delete them.
Don’t use the “new” and “import” buttons on the list view to create populations. They don't show the same form as when you create a population from the availability form on the calendar, so the records will be incomplete.
Check-in queue setup & management
The advising check-in queue provides a way for students to check in to appointments and drop-ins. This feature can be used by either a front-desk employee or at a self-serve kiosk.
When students check-in, an advisor can see appointments with the status set as "checked-in" in the Appointments list view. You can view the list of students checked in by queue or for you specifically. You will also receive a notification in Trellis when a student has checked in for an appointment with you.
If you are part of a group of advisors that meets with the same set of students, you could use the queue feature so anyone of you can meet with the students. Contact 24/7 IT Support Center about setting up a queue for your area.
Setting up the check-in browser.
- Select "Advising Queue Check-in" from the main navigation menu.
- Choose your queue from the "Choose Owner" field.
- Choose whether to allow scheduled appointments only, or both appointments and drop-ins and if you are going to allow Cat Card Swipe.
- Select "Next" to the right. A URL will be provided for you to copy and paste into a browser window.
- Open the URL on your check-in computer on another browser window.
- In the case where students will be checking in at a kiosk, open the link in an incognito browser window. Close all your other browser windows, too.
View the queue
- From Advisor home drop-down menu choose “Appointments”.
- From the “Recently Viewed” or the pinned menu drop-down, choose from the queues listed.
Once you set up a check-in queue and open the generated URL on a device, students will be able to use it to check in to appointments and drop-ins.
Checking in to an appointment
Students will:
- Select the check-in method (Arizona email, SID, or name and birthdate) or CatCard Swipe.
- Type info based on the selected method.
- If available, select the option for checking in to an appointment.
- Select the "Next" button.
- If successful, the student sees a confirmation screen.
- After a student checks in, the appointment's status is updated to "Checked in". A notification will also appear for you in Trellis.
- If an appointment is not found, the student will be asked if they want to create a drop-in appointment (if available).
Students can't check in to the same appointment twice. If they try to, they'll be asked if they want to create a drop-in appointment (if available).
Checking in to a drop-in
Students have the option to create a drop-in appointment if you set it up for your check-in queue.
Students will:
- Select check-in method (Arizona email, SID, or name and birthdate) or CatCard Swipe.
- Type info based on the selected method.
- For the check-in option, select "drop-in".
- Type what the student would like to discuss and a specific Advisor if applicable.
- Select the "Next" button.
- If successful, the student sees a confirmation screen and a drop-in appointment is created in Trellis.
To request a queue, IT needs the following information.
In order to use a check-in process in Trellis, a queue must first be set up. This request must be submitted to 24/7 IT Support Center and must include the following:
-
The name you want for your queue. The queue names have a character limit of 10, so most departments are using a college acronym and then an identifier for their group.
-
The netIDs and first/last name of all of the users in Trellis that will need access to the queue. This includes any staff who assist with managing check-ins. Anyone that is requested to be a part of a queue must already be a user in Trellis. If they’re not, please request access for them through the Access Provisioning Tool first and then they can be added to the queue.
Helping students use Trellis
Students can access Trellis through two ways: the general link and your direct calendar link.
The general link for students is http://student.trellis.arizona.edu/.
Actively enrolled students sign in with their NetID credentials.
Prospective students can sign in with a social media account. The available options are Facebook, Google, and LinkedIn. When the student becomes actively enrolled, they will begin signing in with their NetID credentials instead.
Your calendar link
You can also provide your students with a link that directly takes them to your calendar. To find this link:
- Go to your Trellis profile.
- Find the "Calendar Link" field and copy the link.
We recommend replacing your UAccess and ARC website links with your specific calendar link, rather than the general link.
After signing in to the Trellis student community, students will see available services, such as a list of all the advisors assigned to them.
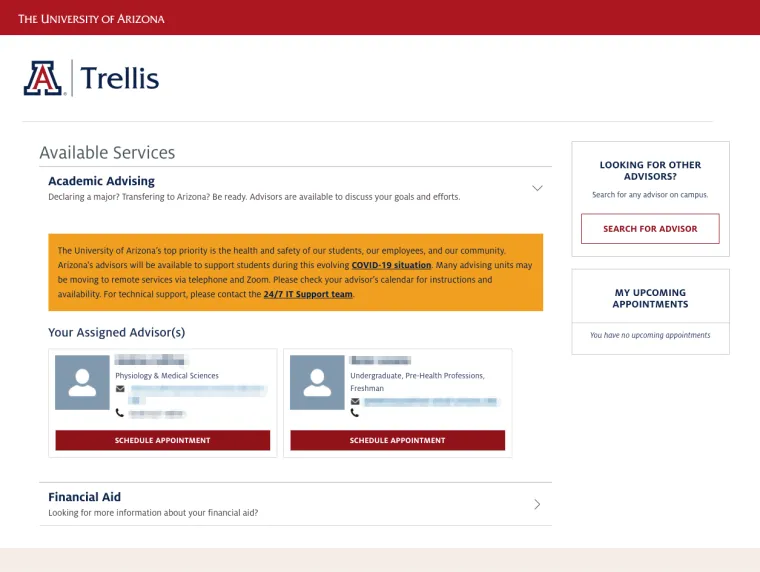
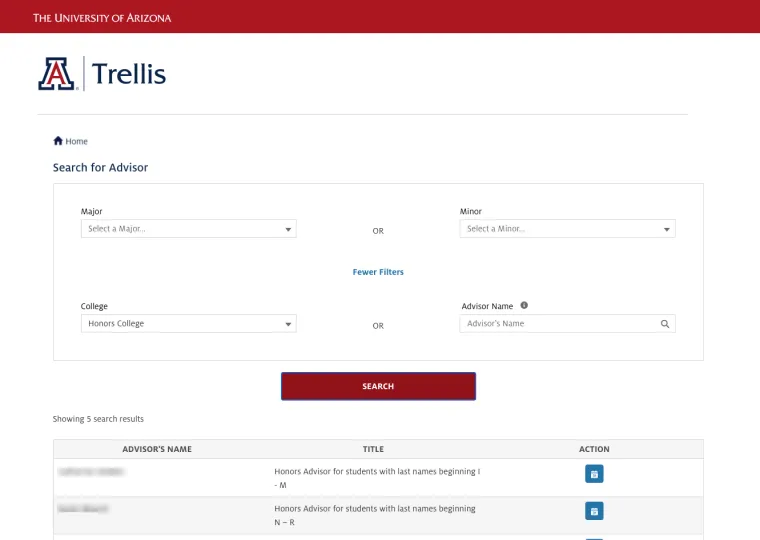
Note: If a student doesn't see the advisor they're looking for, they can select the "Search for advisor" button on the right side to find other advisors.
After the student selects someone to meet with, they will see that person's availability calendar.
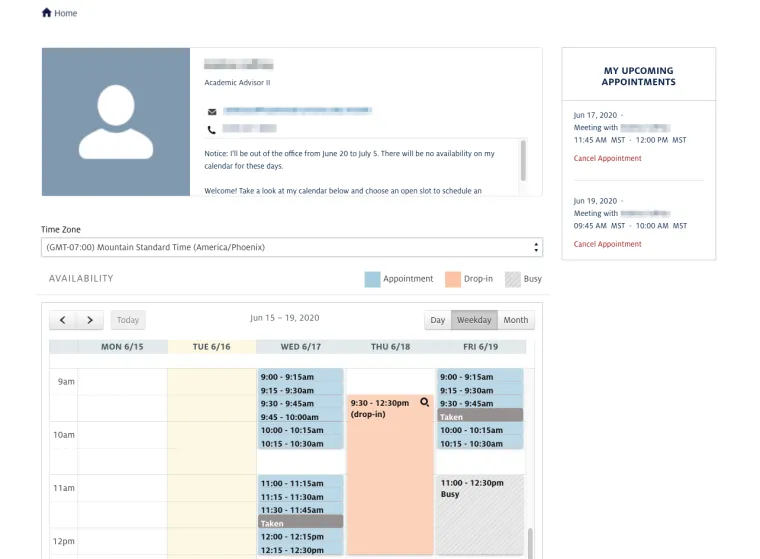
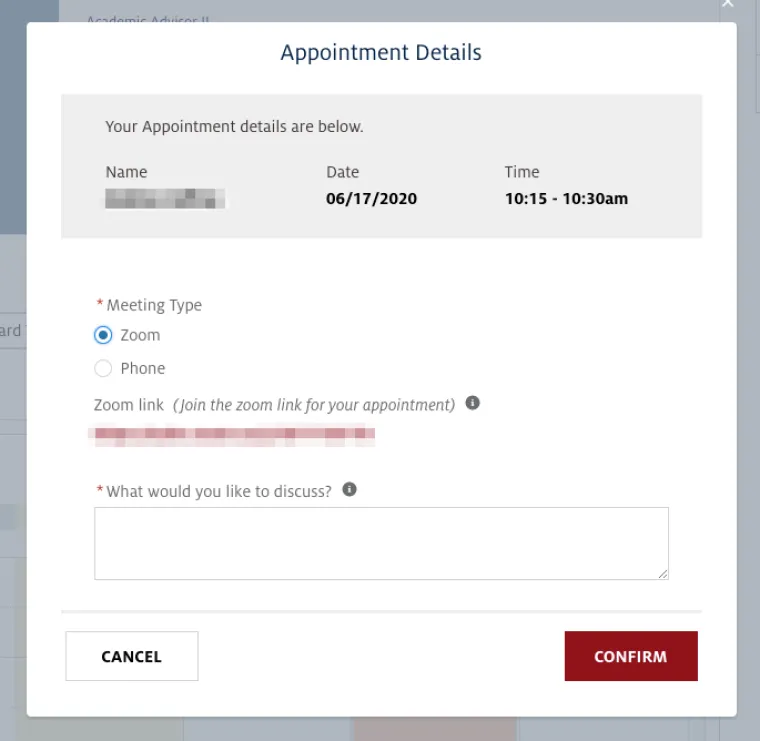
Students can select any of the open appointment slots to schedule an appointment. The student can then see appointment details. They will have to select a meeting type (if applicable) and type in what they would like to discuss.
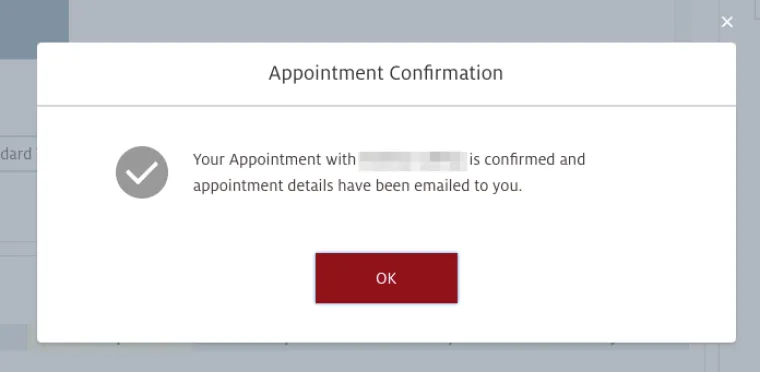
Once the student confirms the appointment, they will receive a confirmation message.
Students can also select a drop-in availability block to see the drop-in details.
Students might encounter issues when using Trellis. See below for common problems with possible causes and solutions.
- Student cannot sign in
- Common problem: Wrong URL
- Solution: The student URL is http://student.trellis.arizona.edu/ (AKA https://ua-trellis.force.com/uastudent).
- Not: "https://ua-trellis.force.com/uastudent/s" or "https://ua-trellis.force.com/uastudents"
- Essentially, there is no "s" at the end.
- Solution: The student URL is http://student.trellis.arizona.edu/ (AKA https://ua-trellis.force.com/uastudent).
- Common problem: Single sign-on error
- Solutions
- Refresh the page.
- Sign out of your NetID credentials, then sign back in to Trellis with your NetID credentials.
- Solutions
- If the solutions above don't work, the issue is likely more technical in nature. You or the student should contact 24/7 IT Support to report the issue.
- Common problem: Wrong URL
- A student cannot see availability on your calendar.
- Common reasons
- You do not have any more availability open because other students have booked it.
- You have no availability scheduled.
- The student does not belong to any of the populations you selected for your availability.
- Solution: Explain the above information. If the student wants to meet with you, work with them to schedule some time.
- Common reasons